At this point, you should have been given a PDB file containing your system of interest from the BioChemCoRe teaching team. If you did not, please let us know now.
Motivation
Why do we need to go through system setup for MD?
Protein structures from various structural determination methods often are not complete. For example, structures from X-ray crystallography typically do not have resolved hydrogens. Take a second and research why X-ray crystallography does not provide the positions of hydrogens. Write your answer in your notebook.
Given the importance of hydrogen bonding, which requires hydrogen participation, for protein stability and receptor-ligand interactions, X-ray crystal structures cannot be used used in molecular dynamics (MD) right “off the shelf”. To help resolve this and many other issues, a variety of software tools have been developed. The remainder of this tutorial will walk you through the process to set up your HSP90 system of interest for a MD experiment.
Getting the Structure
tar -xvf ${BCCID}.tgzDownload the tarball (${BCCID}.tgz) corresponding to your assigned system from
the BioChemCoRe Protein Data Bank
and copy the file into your personal /scratch/${username} directory. Tarballs
(.tgz or tar.gz) are a way to pass around compressed sets of files and
directories. Replace ${username} with your assigned username for Keck 2.
Extract the tarball to your personal scratch folder.
/scratch/${username} and NOT your Home directory (~/). This
is because, for the Keck 2 system, the Home directory is shared across all computers.
This means that whenever you modify files in your Home, they must be
synced across the network with a centralized server. For data intensive tasks
such as MD, if you run in Home, a lot of data must be synced across the
network. This will slow down not only your running task but also the internet
and tasks of all other Keck 2 users!Protein Preparation Workflow
One tool of extreme utility is Maestro. It acts as a molecular visualizer, and a workflow starting point for many of Schrodinger’s tools. Today we will be using the Protein Preparation Workflow to clean up our structure. Note that for each step you will create a new entry in the Entry List. Make sure you’re using the lastest entry before you move forward through each of the following steps.
Loading and Visualizing
-
To load the Schrodinger toolkits, in Keck 2, issue the following commands in a terminal:
module load schrodinger
maestro
module -H. It provides ways to
list available modules as well as currently loaded modules.-
Next, load your pdb file.
File > Import StructuresAfter importing, the Workspace will show a representation of our protein. Using the left mouse button allows you to select residues or areas, middle mouse rotates the view, and the right mouse button translates.
-
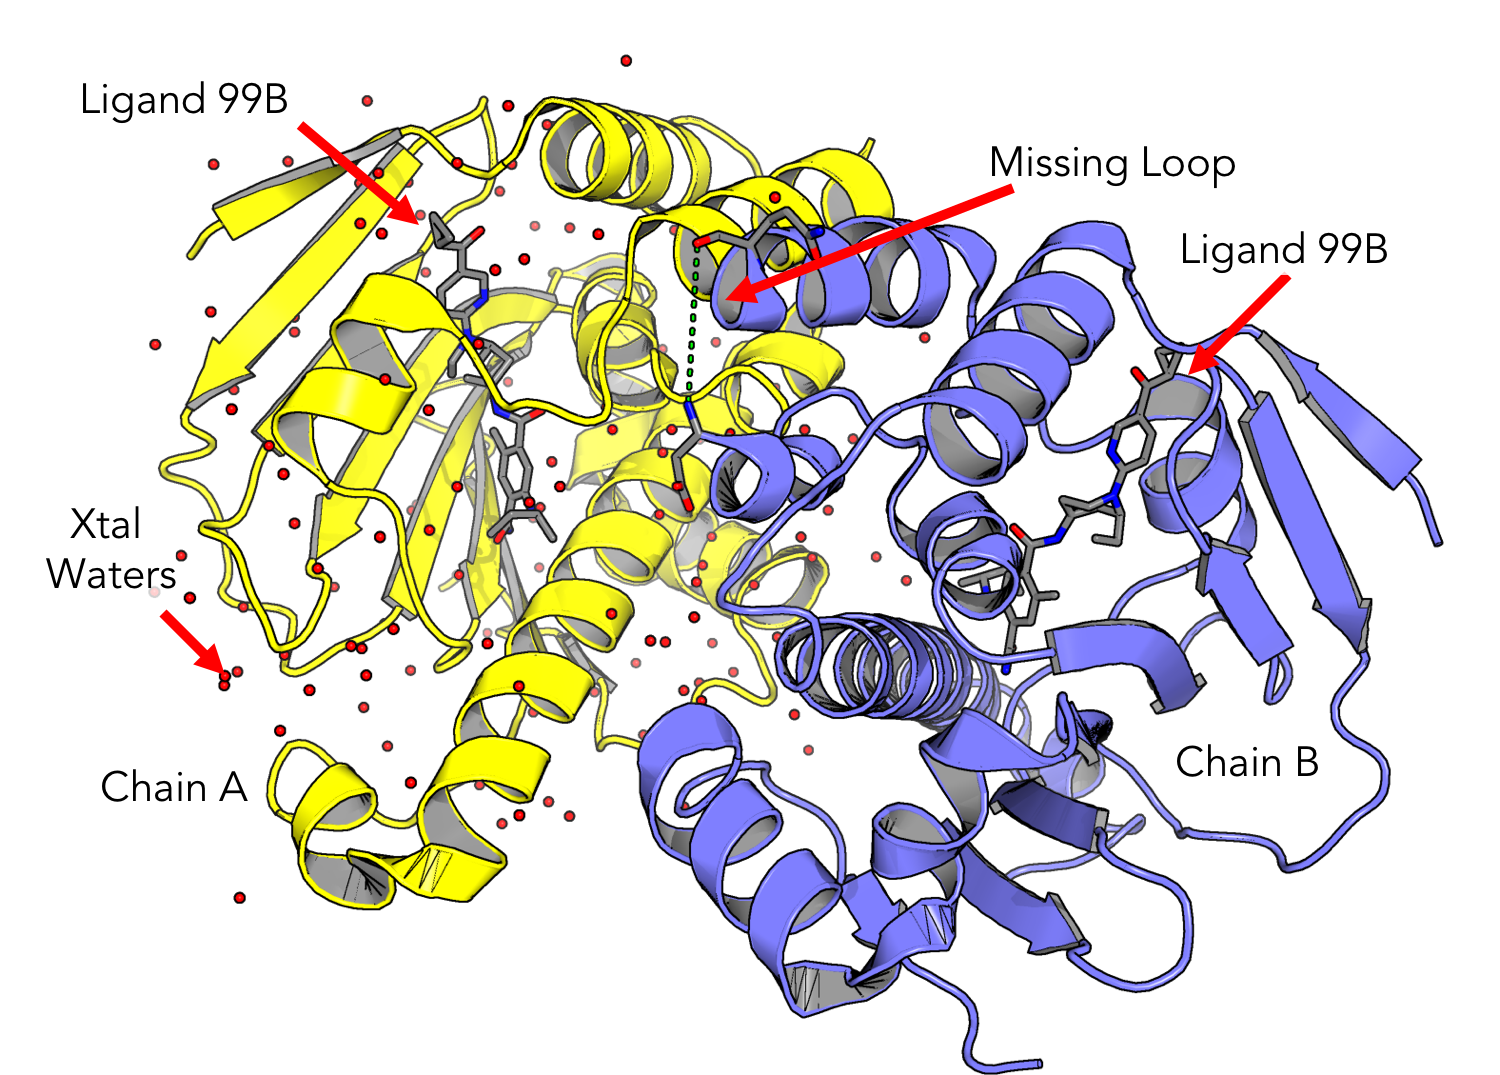
Take some time to examine the structure. Can you locate the inhibitor molecule? Are there any crystallographic waters present?

Splitting Chains and Truncating
-
HSP90 is a dimer, which means it may have multiple chains. On the bottom center of the Maestro window, look for the info table entry for “CHAINS.” If there are multiple chains, separate them by right clicking on the structure name in the “Entry List” pane and selecting:
Split > By Chain -
Once split, each chain will show up separately in a new grouped entry. Select chain A by clicking the blue dot.
-
Open the sequence viewer pane
Window > Sequence Viewer. Now you should see the one letter amino acid codes for your protein sequence at the bottom of the screen. If your structure contains a missing loop, you may see a gap in the sequence viewer denoting this. -
An important part of designing an experiment is to set reasonable controls. For our project we want to ensure that all of the HSP90 systems contain the same residue sequence. Our reference will be to the sequence given in HSP90.fasta. To compare, with chain A selected, go to
Tasks(in the top right) and open “Multiple Sequence Viewer” (MSA) by searching. This window shows the sequence of your loaded protein highlighted in dark letters. If there’s additional data in the pdb file about unresolved esidues, there may be some lightly shaded letters as well. -
In the MSA window, click on
File > Import Sequenceand loadHSP90.fasta. Ensure that the loaded sequence begins with “VETFA” and ends with “TLFVE”. Now, click the “Pairwise Alignment” button, which looks like two blue arrows going opposite directions. This will align the protein sequences.Do you have any dark-shaded residues extending past the beginning or end of the reference sequence? If so, you need to truncate your sequence to the correnct length. Return to the main Maestro window and open the sequence viewer (
Window > Sequence Viewer). Then go to the sequence view at the bottom of the window, and right-click any overhanging residues you observed and click “Delete.”
-
Your structure should contain only Chain A, your ligand, and waters. If you have any extra solvents right click and delete them. An easy way is to expand the entry in the “Structure Hierarchy”.
Stop here and have a mentor check your structure!
Protein Preparation Wizard
-
With Chain A selected, click the “Protein Preparation” button in the top bar. This will open up the Protein Preparation workflow tab.
- On the first tab, we have Import and Process. We have the option of also
including the diffraction data, biological unit, and alternate positions.
These are often useful for validating the quality of the structure,
but here we will not be using them. Before proceeding, make sure only the
following options are selected:
- Assign bond orders: assigns whether each bond is a single or double bond
- Use CCD database: look up information about the bound inhibitor to make sure it gets modeled correctly
- Add Hydrogens: hydrogens are not resolved, so we have to add them back
- Remove original hydrogens: delete any resloved hydrogens from the X-ray structure
- Create disulfide bonds: attach cysteines within reacting distance
- Convert selenomethionines to methionines: convert selenomethonines (used in phasing) to biologically relevant methonine
- Fill in missing side chains using Prime: if only part of a side chain is present, add the atoms
- Fill in missing loops using Prime: add in atoms for missing residues and connect them
- Cap termini: cap the termini with non-charged groups for MD
Next, click Preprocess. You should see a pop-up asking for a .fasta. Click “Yes”. Just like when we did the sequence alignment, select
HSP90.fasta. This tells Maestro to use the provided sequence as the reference.Prime will take a couple of minutes to run and the results will be incorporated into the Workspace automatically. You can monitor the progress of these jobs by clicking on the “Jobs” tab on the top right of the main window. Preprocessing will notify you that the results have been incorporated when it’s done.
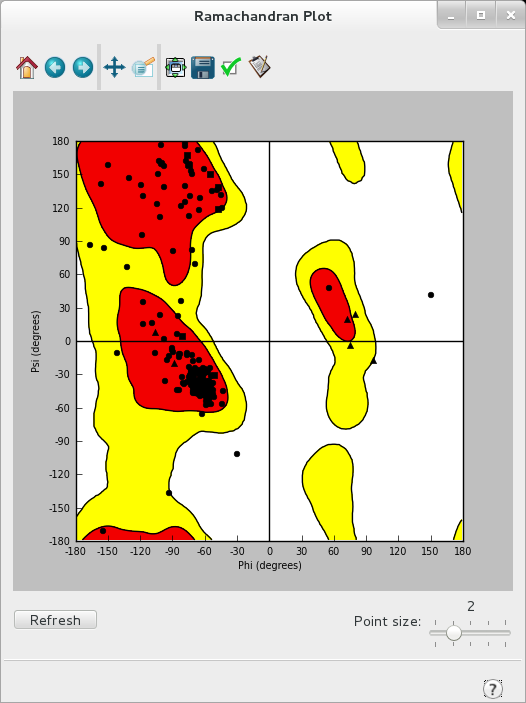
- After preprocessing is complete, click through the “View Problems”, “Protein Reports”, and “Ramachandran Plot” tools along the bottom. These tools give you an idea of what potential issues to lookout for going forward in preparing your structure.

-
We can now move on to the next tab, “Review and Modify”. First click on Analyze Workspace, Maestro will take a second to load up all waters and other ligands (metals, inhibitors etc). In this pane, we can manually inspect each water or ligand to determine whether or not to modify or delete it. You should keep any waters and the inhibitor while deleting other small molecules that were missed earlier.
-
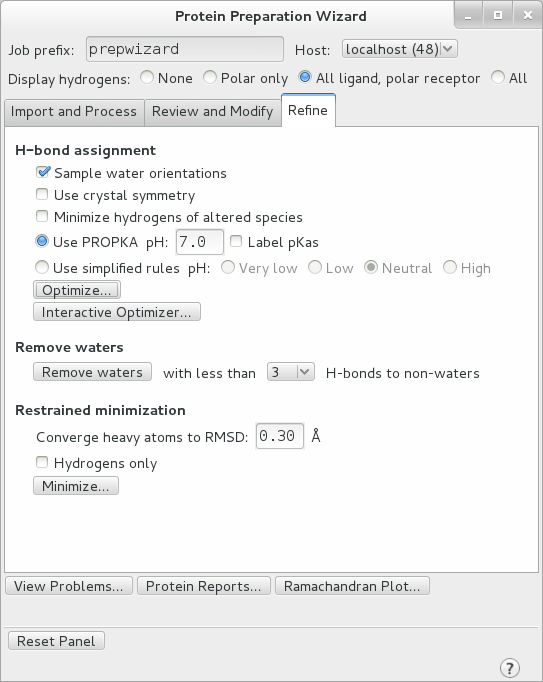
Move onto the final tab of the Workflow, “Refine”. Here under H-bond assignment select Sample Water Orientations, as well as Use PROPKA pH: 7.0 to assign the protonation states of each residue. Click optimize.

-
After optimization is complete, remove all waters with fewer than 2 H-bonds to non-waters and perform a restrained minimization with the default RMSD of 0.30 A. This removes all waters which are not interacting substantially with the protein. Make sure the “Hydrogens only” box is NOT checked and click “Minimize…”. This relaxes the structure in preparation for MD.
Have your mentor check your structure again!
Saving Maestro Prepped Files
Finally, look at your protein structure in the main window. We’re going to save the whole system first, then we’re going to save the ligand in a separate file.
-
To save the whole system, right click the minimized entry in the Entry List and select
Export > Structures, then save this as${BCCID}_maestro.pdb. -
To save the ligand, go to the Structure Hierarchy listing below the Entry List. Expand the object corresponding to your final prepared protein, then Expand “Ligands”, and right click the ligand and select “Copy to New Entry”. View just the ligand by itself (should be called “Structure##”) in the Entry List.
You should learn your ligand’s 3-character name. Make sure that Maestro is in residue selecting mode (There will be a big “R” in the top left corner of the screen). Then, click on your ligand to select it. In the bottom center of the screen, there should be a 3-character residue code. That is your ligand’s name - Write it down! Also, note the charge of the ligand which is visible in the bottom pane when the mouse is not over any atoms. This is your ligand’s charge - Also write this down!
Right click on the new ligand only entry and select
Export > Structures. Save this as%{LIGID}_maestro.mol2.
Parameterization
Let’s try to assign parameters to the resulting whole system pdb using the Amber forcefield “FF14SB”. Parameterization requires a lot of technical expertise, and can be one of the most frustrating parts of setting up an MD simulation. With a little patience we’ll be simulating in no time!
-
First we must load Amber into our work environment, in the terminal type:
module load amber/18 -
tleap is a utility provided by Amber for system setup. Simply type
tleapin the terminal. A new program will pop up in the terminal. Typehelpin the tleap prompt to show lists of available commands.Into this prompt type the following commands (Note that my protein file is called “protein_name_maestro.pdb” in this tutorial – Yours will have a different name):
 source leaprc.protein.ff14SB
 source leaprc.water.tip4pew
 pdb=loadpdb protein_name_maestro.pdb
At this point you will see a bunch of error messages pop up!
 Loading PDB file: ./protein_name_maestro.pdb
 Unknown residue: NMA   number: 209   type: Terminal/last
 ..relaxing end constraints to try for a dbase match
   -no luck
 Unknown residue: 99B   number: 210   type: Terminal/beginning
 ..relaxing end constraints to try for a dbase match
   -no luck
 Created a new atom named: H within residue: .R<ACE 16>
 Created a new atom named: H1 within residue: .R<VAL 17>
 Created a new atom named: HD1 within residue: .R<HIE 189>
 Creating new UNIT for residue: NMA sequence: 225
 One sided connection. Residue:  missing connect0 atom.
 Created a new atom named: N within residue: .R<NMA 225>

 ...
There are three classes of errors here:
- AMBER has a built-in forcefield for proteins (and a few other molecules) called FF14SB. tleap expects each protein atom to have a residue and atom name which perfectly matches what is given in FF14SB. However, Maestro has different names for some residues.
- We capped the termini of the protein so it wouldn’t have charged groups hanging out at the beginning and end of the amino acid chain. While real proteins do have these charged groups hanging out at their N- and C-termini, we’re missing amino acids from the beginning and end, so there shouldn’t really be a charge there. We use “caps” to add a small, neutral group to the termini of the chains to prevent there from being a charge. This is important, because +1 and -1 charges make a big difference on an atomic scale.
- We have this non-protein molecule (the ligand) in the mix. AMBER has never seen this thing before (it’s not in FF14SB), so it has no clue how to parameterize it. We’ll have to determine the charges on these atoms (because that’s what will determine most of its interactions), and then we can use generic parameters for the bonds (the Generalized Amber Force Field, or GAFF).
Let’s exit out of tleap to resolve these problems. We will return later to try to setup the simulation once things are resolved. In the tleap terminal, type
quit. -
First, the capping groups. Open the PDB file in a text editor. The caps are the first and last “residues” in the protein. They’re not really residues/amino acids, just little groups that were stuck on the ends, but PDB files require everything to have a residue number. It’s a real pain in the neck to rename all the atoms in a capping group, so let’s not. tleap is clever and will reconstruct any atoms that it knows should be there, so let’s just leave in the important atoms from each cap and let tleap do the rest.
- In the ACE (“acetyl”) cap, delete all the atoms except the ones named “C”, “O”, and “CH3”.
- In Val17, delete H1 if it’s there
- Then, scroll down to the end of the chain to NMA (“N-methyl amide”). Change “CA” to “CH3” (delete a space afterwards to make the columns line up.
- Then delete all the NMA atoms except “N” and “CH3”.
- Also, FF14SB calls it NME instead of NMA, so change that too.
- After the end of the protein, the next entry is the ligand. The residue name should correspond with the name you wrote down from Maestro. If your ligand has a “CL” atom, you will need to rename it to “Cl” (change the L to lowercase).
- Save the current file with a new name, replacing
_maestro.pdbwith_fixedCaps.pdb.

-
Now let’s take care of the histidines. A histidine sidechain can have three protonation states. Maestro already did the calculation to figure out where the hydrogen on each histidine sidechain should be, but it didn’t name them in the way that AMBER/FF14SB wants. We’ll need to look at each one by eye. If you closed the window already, reopen your final structure in Maestro.
Our HSP90 system has four histidines. Visually inspect each and compare with Scheme 1 to determine what the name of each histidine should be. To center the view on a specific histidine, middle click on its one letter code in the Sequence Viewer pane. Then go to the appropriate atoms in your PDB text file and change the “HIS” label to what it should be (“HID”, “HIE”, or “HIP”).
- When done, save the coordinates to a new PDB file with
_fixedCaps.pdbreplaced byfixedCapsHises.pdb.
Antechamber
Singling out the ligand for special treatment The next step is to prepare the ligand for simulation. Here we use the AMBER utility “antechamber” to run an AM1-BCC semi-empirical quantum mechanics calculation to determine partial charges.
-
Going back to
${LIGID}.mol2which we saved from Maestro. Recall, does your ligand have a net charge? This is important! Change the “-nc” argument below to match.antechamber -i ligand_name.mol2 -fi mol2 -o ligand_name.in -fo prepi -c bcc -nc ##In English, these arguments mean:
-i input file -fi input format -o output file -fo output format -c calculation type here AM1-BCC -nc net charge (the charge you wrote down for your ligand) -
Once the program completes, execute the following command to parse the prepi file to generate a frcmod.
parmchk2 -i ligand_name.in -o ligand_name.frcmod -f prepi -a YA frcmod file is an Amber forcefield supplementary file defining the various parameters. It’s just a normal text file, try to open it with your favorite text editor (
gedit ${LIGID}.frcmod). We will need the${LIGID}.inand${LIGID}.frcmodfiles in the next step.
Parameterizing and Solvating
- At this point, we should have resolved the previously encountered issues.
Let’s try running everything through tleap again. Run
tleapand execute the following. Comments are shown after the ‘!’, do not type this.source leaprc.protein.ff14SB source leaprc.gaff ! needed for ligand params source leaprc.water.tip4pew ! needed for water params loadamberprep ${BCCID}.in ! from antechamber loadamberparams ${BCCID}.frcmod ! also from antechamber pdb=loadpdb ${BCCID}_fixedCapsHises.pdbAt this point, the pdb should load without any errors and tleap should add in any extra necessary atoms for you.
Have your mentor ensure that the above steps loaded the protein correctly.
-
First, we determine if the system has a net charge, and how many ions we’ll need to counterbalance it. In tleap type:
charge pdbThis command will tell you the net charge of the system. To simulate being in the cytoplasm, we will add some ions (cells are kinda salty). These atoms will be Na+ and Cl-. Add around 40 ions to neutralize your system. For example, if your system has a net charge of -7, add 23 Na+ ions and 16 Cl- ions.
solvateBox pdb TIP4PEWBOX 10 ! solvate with 10 A buffer addions2 pdb Na+ ## ! How many positive charges should you add? addions2 pdb Cl- ## ! How many negative charges should you add? -
Check your ion math by making sure the resulting charge is 0. Again, type in tleap
charge pdb. If it’s 0, or very close, then continue on. - Save the solvated and parameterized system by executing the following.
saveamberparm pdb ${BCCID}.prmtop ${BCCID}.inpcrd
savepdb pdb ${BCCID}_formd.pdb
quit
Running Molecular Dynamics
We are now ready to run the MD simulation. The Amaro group has developed a set of default simulation parameters which we will be using. These can be found in the folder with your protein.
-
Locate the files
${BCCID}.inpcrdand${BCCID}.prmtopwhich were previously generated by tleap and copy them into eachmddirectory. Make sure you are working in a subdirectory of /scratch/your username/. We are now ready to run molecular dynamics.In the MD directory, you will see many amber input scripts with the
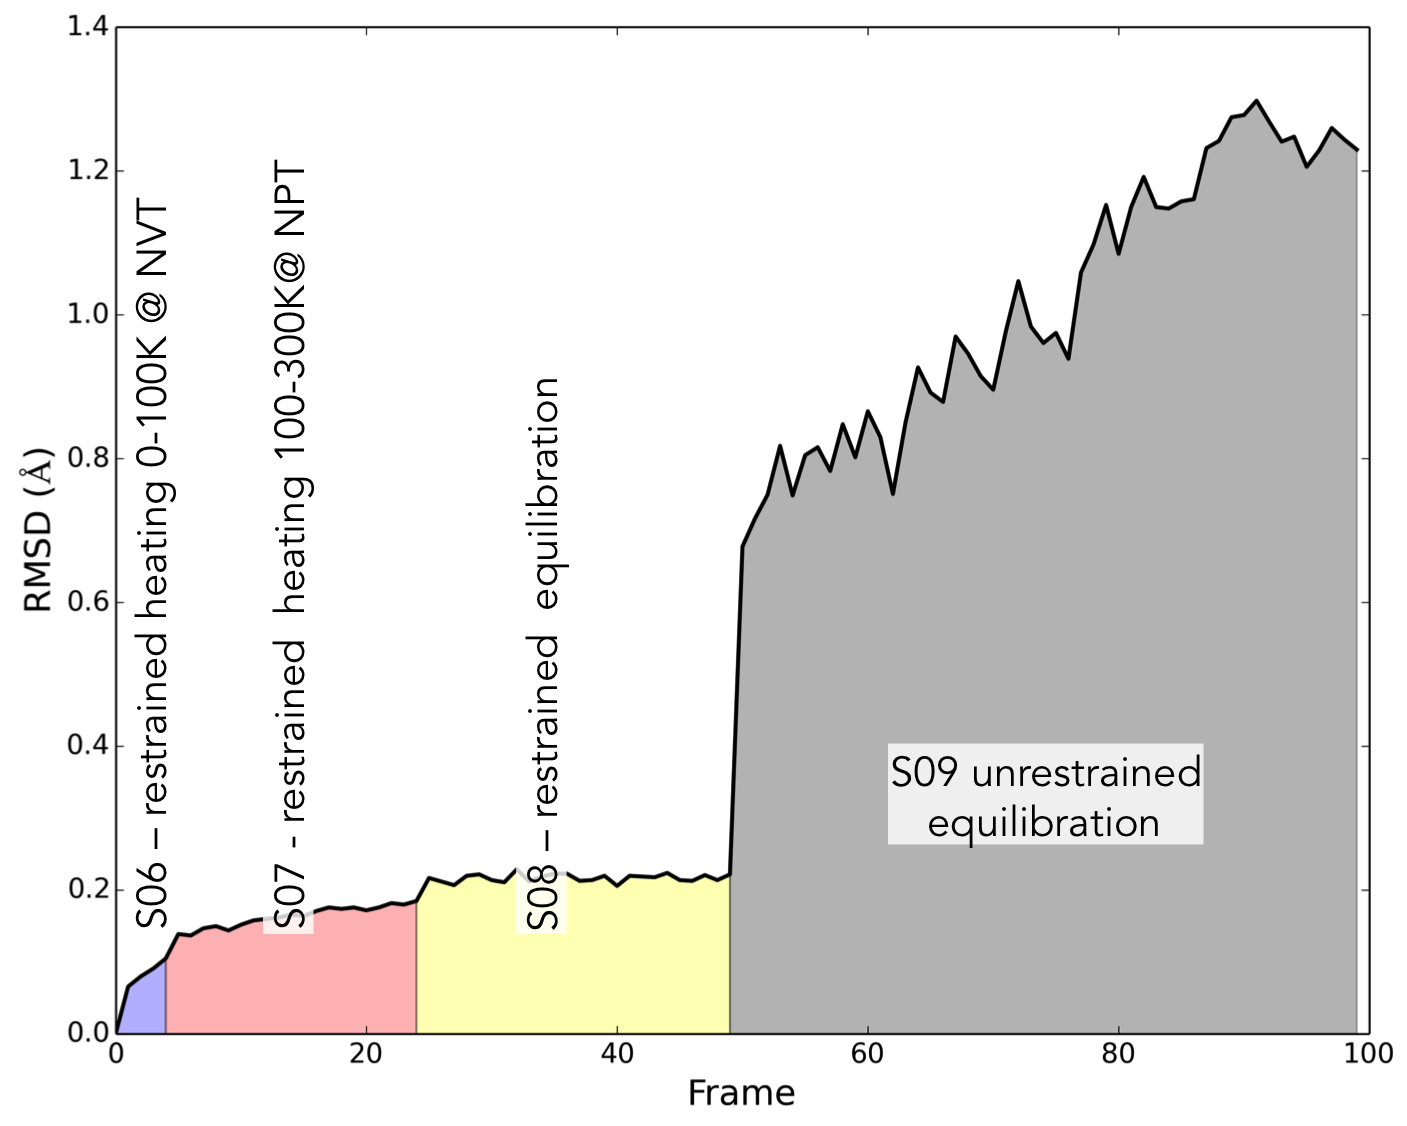
.inextension. Steps S01-S05 carry out a series of restrained minimizations that allow the protein structure to relax, starting with the lightest atoms and slowly adding more. S06-S07 are heating steps, where the temperature of the system is slowly increased until it reaches physiological temperature. Finally, S08 and S09 are a final equilibration stage where the restraints on the protein are slowly removed. By performing this stepwise relaxation and equilibration, and restraining the protein, we can bring the system up to temperature without accidentally denaturing the protein.S10 is the production step. Now that we have a stable system, we can run a long MD simulation where we will generate data for later analysis. We have included a convenience script which will execute
pmemd.MPIorpmemd.cudafor each step as appropriate../runme.shYou can watch the progress of the calculations by executing this command which will write out the contents of the
mdinfofile every 2 seconds.watch -n 2 cat mdinfoUse
Ctrl-Cto exit out ofwatchwhen you are done.
